Removing and Installing Front Pipe Spring Clamps
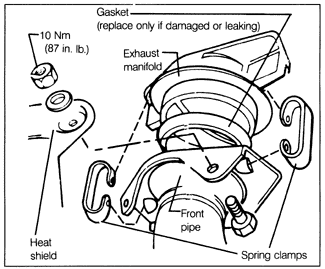
On all engines using spring clamps to fasten the front pipe to the exhaust manifold, as shown in Fig. 4-8, the clamps must be expanded to remove them. To avoid personal injury or damage, use of the expanding wedge set, Volkswagen special tool no. 3140, is highly recommended for removal and installation of both old and new clamps.
WARNING-
Due to the spring tension in the clamps, serious injury may result from improper handling or from attempts to remove or install the clamps without proper tools.
|
| Fig. 4-8. | Exploded view of front pipe connection with spring clamps. |

|
To remove:
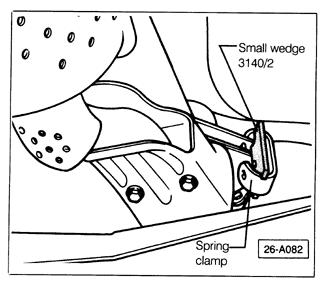
| 1. | Push the front pipe to one side to expand the opposite clamp. Insert one short wedge in the expanded clamp as shown in Fig. 4-9. Push the pipe the opposite way to expand the other clamp and insert the other short wedge. |
| Fig. 4-9. | Short wedge being installed in expanded spring clamp. |

|
CAUTION-
When inserting wedge into spring clamp be sure it is completely inserted. The shoulders of the wedge should butt against the edge of the clamp.
|
WARNING-
Use extra caution when handling the expanded spring clamps. Spring tension can expel the wedges with considerable force and may cause serious injury. Wear safety goggles or safety glasses.
|
| 2. | Push the front pipe to one side, and use a pair of locking pliers to grasp the clamp and wedge on the opposite side and remove them as a unit. |
| 3. | Repeat the operation to remove second clamp and wedge. |
| 4. | If the old clamps are to be reused, the wedges should remain in the clamps until they are reinstalled. If it is necessary to replace the clamps, place the old clamp with the installed wedge between the jaws of a vise, as shown in Fig. 4-10. Open the jaws of the vise approximately 15 mm (9/16 in.). |
| Fig. 4-10. | Removing short wedge 3140/2 with longer starting wedge 3140/1. |

|
| 5. | Use a soft-faced mallet to drive the longer starting wedge into the clamp next to the short wedge, to further expand the clamp. |
| 6. | Turn clamp over, knock out the short wedge, then knock out longer starting wedge. Repeat this process to remove the wedge from the other clamp. |
WARNING-
The wedge will be expelled with considerable force. Provision should be made to catch the wedge in a safe container or trap to avoid injury.
|
To install:
| 1. | If the spring clamps are being replaced, place a new clamp on its side in vise jaws and, using a soft-faced mallet, drive the longer starting wedge into clamp until it is spread enough to allow insertion of the short wedge next to the starting wedge. Drive in the short wedge until its shoulder butts against the edge of the spring clamp. |
WARNING-
Do not attempt to insert the short wedge until first spreading the clamp with the starting wedge. Serious injury and tool and clamp damage may result.
|
| 2. | Turn the clamp over and knock out the starting wedge, leaving the short wedge in place. Repeat the operation for the second clamp. |
| 3. | To install the clamps, position the front pipe against the exhaust manifold. If the gasket has been removed, it should be placed in position at this time. Push the pipe to one side and install an expanded clamp and wedge on that side. |
| 4. | Push the pipe to the other side and install the remaining clamp and wedge on that side. With the pipe in this position, remove the first wedge from its clamp. Use the mallet if necessary. |
| 5. | Push the pipe to the other side and remove the second wedge. |
|


