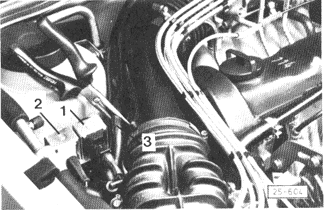
Idle Speed Boost ValveThe idle speed boost valve maintains the idle speed within a 300 rpm range, compensating for varying engine loads at idle. A second valve is used on air-conditioned cars to boost idle speed when the air conditioning is on. The electrically operated valves, shown in Fig. 5-18, allow additional air to bypass the throttle plate and increase idle speed whenever the idle speed drops below 750 rpm. Above 1050 rpm, the valves close and idle speed is reduced. The idle speed boost valve is a solenoid valve controlled by an electronic control unit on the fuse/relay panel that turns the valve on and off according to an engine speed signal from the coil. Below 750 rpm, the control unit sends a voltage signal which opens the valve. The valve should open with an audible click. When engine speed exceeds 1050 rpm, the control unit cuts the voltage signal to the valve and it closes. The second boost valve on cars with air conditioning is switched on and off at the same time as the air conditioning compressor. If the valve does not respond as specified, check the voltage signal to the valve at the harness connector, using a test light or a voltmeter. If the valve is receiving a voltage signal below 750 rpm and not opening, the valve is faulty and should be replaced. If the valve is not receiving voltage below 750 rpm, check the signals to and from the control unit as described below. On Jettas, the system also has its own fuse (check fuse no. 18).

Using the terminal numbers on the back of the control unit as a guide, test at the fuse/relay panel sockets. Test for continuity to ground at the socket for terminal 31. With the ignition on, check for battery voltage (approximately 12 VDC) at the socket for terminal 15. With the engine running, test for voltage between the socket for terminal 1 and ground. Also check the continuity of the wiring between the panel and the valve's harness connector. If no wiring faults are discovered, and the system does not function properly, then the control unit is faulty and should be replaced. See CURRENT FLOW DIAGRAMS for help in troubleshooting the wiring. |